Mutli-Factor Authentication (MFA) is an additional layer of security for your Olivet account. It makes your password easier to manage and adds extra security by requiring a second factor when logging in from an unknown device or if your account is being attacked.
Secure your account now using the video and steps listed below.
Before You Start
- Read this whole guide first!
- This process works best using two different devices.
- A phone or mobile device to receive MFA prompts (steps below marked "On your phone:")
- Another computer or device to access your account (steps below marked "On your web browser:")
- Review supported mail apps: This is an important step since most built-in mail apps don't support MFA.
- See the App Compatibility chart below.
- Android: Only Outlook App works.
- iOS: Only specific versions of Mail app works, otherwise you need the Outlook App.
- If you do not have a supported app, you will need to install one.
- Review recommendations:
- Install Microsoft Outlook on your mobile phone/devices
- Install the Microsoft Authenticator app on your mobile phone/devices
- Decide what "factors" you will use during setup.
- Other Information
App Compatibility
| Operating System |
Mail App |
App Version |
Supported? |
Windows
7 or later |
Microsoft Outlook |
2010 or eariler |
No |
| 2013 |
Partial |
| 2016 |
Yes |
| 2019 |
Yes |
| Other Mail App |
Any |
No |
MacOS
Mojave (10.14) or later |
Microsoft Outlook |
2013 or earlier |
No |
| 2016 |
Yes |
| 2019 |
Yes |
| Other mail App |
Any |
No |
| Android |
Microsoft Outlook App |
Get from App Store |
Yes |
| Built-In Mail App |
Any |
No |
| Other mail app |
Any |
No |
| iOS |
Microsoft Outlook App |
Get from App Store |
Yes |
| Apple Mail App (see considerations) |
10.x or earlier |
No |
| 11.x |
Yes |
| 12.x |
Yes |
| Other mail app |
Any |
No |
1. Install the Microsoft Authenticator App:
- On your phone: Download and install the Microsoft Authenticator app
 to your iPhone (iOS) or Android phone. Please be mindful of the app you download and install the official Microsoft Authenticator App. Logo shown above will be a good indicator of this, also it is a free app.
2. Visit the MFA Setup Site
- On your web browser: Visit email.olivet.edu
- Log In
- Click Next at the following prompt

3. Set Verification Options
-
Open Authenticator on your phone and select the plus icon, and select Add account.
-
Select Work or school account, then tap Scan a QR Code.
-
Notes:
- Your device may prompt you that the Authenticator app is requesting access to your camera
- Your device may prompt you that the Authenticator app is requesting to accept notifications
- Choose ACCEPT to Both Prompts.

- Use the camera to scan the QR code and hit next on the browser

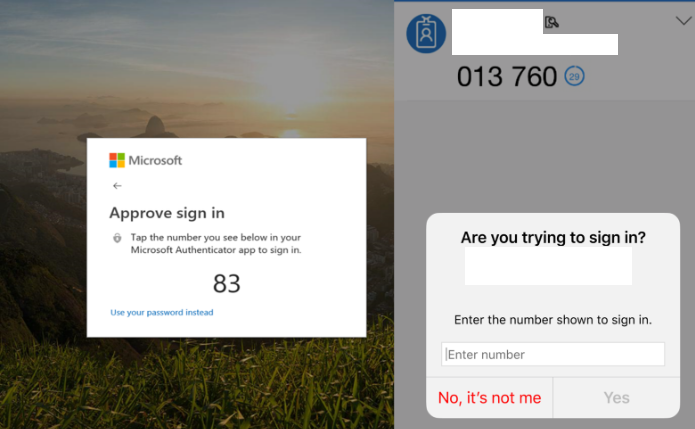
- Approve the authentication prompt on your Microsoft Authenticator app by entering the two-digit number shown to sign in.

- Click Done. Your Microsoft Authenticator app is now set up and ready to use to authenticate your logins.
- You must set up at least two verification/recovery methods. So next, configure at least one additional recovery method ( like phone call/text SMS).
4. MFA is Enabled on your Account
Your account is now enabled for MFA.